


They say a flawless wallpaper job starts long before the first strip ever touches the wall — and they’re absolutely right.
In the world of professional wallpapering, preparation is everything.
According to experienced wallpaper installers from Dallas, 80% of a perfect installation comes down to how well you prep your walls. The remaining 20%? That’s just applying the paper.
So whether you’re transforming an entire home or just creating one stunning accent wall, don’t skip the prep. It’s the difference between magazine-worthy results and a bubbling, peeling disaster.
Here’s how Dallas pros make sure every wall is picture-perfect before the first roll goes up.
Step 1: Clear and Clean the Surface
Every pro knows: wallpaper sticks best to a surface that’s clean, dry, and smooth.
Start by removing anything that could get in the way — nails, screws, hooks, outlet covers, and especially leftover adhesive or old wallpaper. It might be tempting to layer new paper over old, but that shortcut never ends well.
Next, wipe down your walls with a mild detergent or vinegar-and-water mix to remove grease, dust, or hidden residue. This is especially important in kitchens and bathrooms, where humidity and grime like to hide.
Once everything’s squeaky clean, let your walls dry completely. Even a trace of moisture can ruin adhesion later.
Step 2: Fix Imperfections Before They Show Up Later
Wallpaper is beautiful — but it’s also brutally honest. Every bump, crack, or uneven patch will show.
Dallas installers have a saying: “If the wall doesn’t look perfect before, it definitely won’t after.”
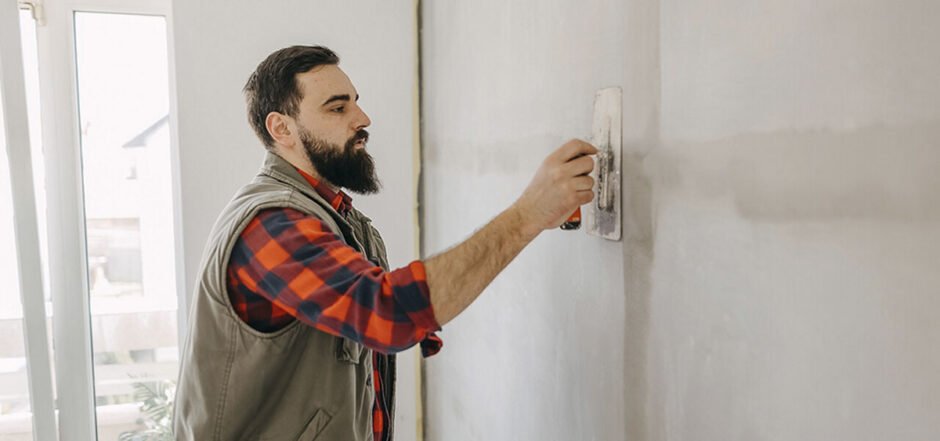
Use spackling compound to fill tiny holes or cracks, and joint compound for anything larger. Once dry, sand the wall using fine-grit sandpaper (120–150). Run your hand across it — if it feels like glass, you’re ready.
Pro tip: hold a flashlight against the wall at an angle. Shadows will instantly reveal uneven spots you might miss otherwise.
When you’re done, wipe away all sanding dust with a damp cloth. A dusty wall is a recipe for peeling seams later.
Step 3: Prime — Your Unsung Hero
If you ask any professional wallpaper installer what separates amateurs from pros, they’ll probably give you one word: primer.
Primer creates a smooth, sealed surface that helps wallpaper glue grip evenly — and prevents it from soaking too deeply into the wall. Without it, you’re asking for bubbles, tears, and early peeling.
Another reason pros swear by primer? It makes future removal way easier. When the time comes to redecorate, you won’t destroy your drywall trying to strip the paper.
Choosing the right primer matters:
- Oil-based primers work best on new drywall or porous plaster.
- Acrylic (water-based) primers are great for painted walls — they dry fast and have low odor.
And remember: use a primer made specifically for wallpaper. Paint primer won’t do the same job.
Step 4: Check Moisture and Texture
Moisture is the silent enemy of wallpaper.
Before installing, test the wall with a simple moisture meter — especially in bathrooms, basements, or kitchens. If the reading’s over 12%, wait until it’s fully dry. Otherwise, you risk bubbles, mold, and peeling edges down the road.
Also, take a close look at your wall texture. If it’s rough or uneven, smooth it with a light skim coat of joint compound. Even minor texture can show through bold patterns or metallic finishes.
Dallas experts put it simply: “The smoother the wall, the smoother the results.”
Step 5: One Last Look Before You Hang
When your walls are clean, patched, sanded, primed, and dry — pause for one final check.
Run your hand along the surface, look for hidden bumps, remove any outlet plates, and make sure everything feels perfectly even.
Most pros recommend letting primer cure overnight before hanging wallpaper. It gives you maximum adhesion and a little wiggle room for adjustments while you align patterns.
Common Mistakes to Avoid
Even experienced DIYers can trip up on the basics. Here are the issues Dallas installers see most often — and how to dodge them:
- Skipping cleaning or sanding. (Dust and grime = peeling later.)
- Hanging wallpaper on damp walls. (Moisture is a deal-breaker.)
- Ignoring primer. (It’s not optional — it’s insurance.)
- Overlooking tiny imperfections. (They will show in daylight.)
- Forgetting to test adhesion. (Always try a small patch first.)
Taking the time to prep might not feel glamorous, but it’s the difference between flawless results and a frustrating redo.
The Bottom Line
Perfect wallpapering isn’t about fancy tools or sheer luck — it’s about patience, precision, and a bit of professional know-how.
As the Dallas pros like to say: “Great walls start with great prep.”
Once your surface is clean, smooth, and primed, the wallpaper practically hangs itself. Patterns align effortlessly, seams vanish, and the final result looks straight out of a design magazine.
So before you pop open that glue bucket, remember — your success is already written on your walls. Prep them well, and every strip you hang becomes a masterpiece waiting to happen.